Showing posts with label DIY. Show all posts

Friday, November 01, 2013

kokoleo-style Spy vs. Spy

UPDATE: My tutorial for these costumes won second place in the Instructables Halloween Costume Contest this year!

The last 3 years my kids have wanted to do brother/sister team costumes for Halloween. In 2011 they were Finn and Jake from Adventure Time. In 2012 they were Mordecai and Rigby from Regular Show. This year, they wanted to be these guys:


They don't read MAD magazine but they watch the animated sketch show on Cartoon Network and love the stop motion Spy Vs. Spy vignettes. This may be the last year they want to do a team costume so I had to oblige. I took a few pictures throughout my process to help anyone else who
 may want to sew some Spy vs. Spy masks too. Here's the gist of how I made them: 

I started with some stiff fusible interfacing - one layer in the shape of the mask and one smaller layer for stablity. Between the two layers I inserted a piece of sheer black satin and straight-stitched around the eyes, then trimmed the excess satin. 


Next on top of mask-shaped interfacing, I lightly ironed (be careful - if your iron is too hot the fleece will melt) some white fleece about an inch larger than interfacing, traced and cut out eye holes, and embroider-stitched around the eyes (then went over it with a Sharpie to make it even darker). 


Then I traced with a pencil some eyebrows and a mouth and sewed an embroider stitch over top (and again went over those stitches with a Sharpie to make it darker. 


Next, I sewed the nose part into the shape of a cone and folded the fleece over the interfacing and sewed all the way around the edge of the mask. Then I hot-glued it to the inside of a hat. 


Lastly, I made them these bags to hold their candy.


And here they are, ready for mischief:


Monday, January 07, 2013

McKenna's House of Liquor

   At the risk of looking like a big old lush, I'm going to admit that one of my favorite Christmas presents to receive is a fancy gift set containing a bottle of liquor and glassware. This year, Erik got me a bottle of Chivas Regal Scotch Whiskey, aged 12 years, that came in a box with 2 funky-shaped rocks glasses. Even the box was deluxe - it had 3 windows and a swing door with a magnetic latch. We couldn't just throw it out.


 McKenna said she wanted to keep it so it could be a house for her dolls but I didn't think it would look right for her to have an empty liquor box laying around her room, so we decided to paint it. First, I covered the windows in sticker paper and spray painted it yellow.


Then, she painted it.


She added trees and flowers on the sides and windows and a door on the back and her signature smiley sunshine on the front.


And the Polly Pockets quickly moved in.


It makes a nice hamster house too. (You can follow the adventures of our hamster Mr.Goomba Roo on facebook: https://www.facebook.com/YourDailyGoomba.)


I'm teaching a new series of craft classes for kids this semester. Liquor box dollhouses probably won't be one of them. Some crafts are best kept within the family.

Tuesday, December 13, 2011

It's beginning to look a lot like Easter... wait, what?

Years ago around Easter I wrote a blog post about artist June Hoffman and the art of Eggeury. In that post I talked about the Christmas ornaments my dad's secretary made for us out of eggs. I always found those fascinating and I think of them every year when we get out our ornaments to hang on the tree. Today I searched for "Christmas Eggs" on Etsy and compiled this treasury:

 (Click on the picture to go to Etsy and see the artists' other work.) 

I love the painstaking detail in each of them and the fact that they've elevated eggs from compost fodder to fragile keepsake.  Since the ornaments my dad's secretary made are all at my parents' house, I decided to make my own for our tree. One of my favorites was an egg that contained a picture of my brother and me, decorated with ribbon and trimmed in pearls. I wanted to do that with pictures of my kids, so here's my attempt:

Here are the supplies I used: an egg, a photo, ribbon and trim, fiberfill, and a hot glue gun.


I carefully poked a hole in the center of a blown-out egg. I'm sure expert use a Dremel or some other tool, but I just used a needle and my fingers, hence the rough edges.


Then I hot glued on some trim to cover it.


 Next, I filled the egg with fiberfiill and carefully inserted the photo inside...


then squirted a dollup of hot glue into the hole at the top, inserted the knot of a string of ribbon,


 tied it in a bow, and hung it on the tree.


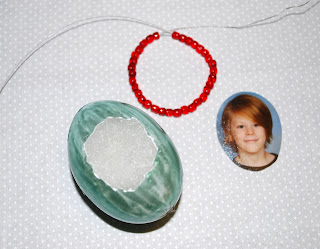
For Sage's ornament, I did it a little differently. I painted the egg with nail polish, glued the photo to the edges of the egg-hole, then glued a ring of beaded wire around the photo.


For the hanging device I squirted some hot glue in the hole on the top and inserted a looped strand of beaded wire. Here it is hanging next to his Shrinky Dink snowman:


 And here they are together, two eggs-tra special ornaments for my eggs-eptional kids.


Check back tomorrow to see the Frosty the Eggman I made! and possibly some others. We had scrambled eggs for lunch today so I have a few more empty shells begging to be transformed.

Monday, September 12, 2011

Sage's Super Mario Birthday Party

Sage and I like to plan his birthday parties. He begins the day after his birthday, planning what he's going to do for the next one. At first, he thought he wanted a Goosebumps (R.L.Stine) party because that's what he was into a year ago, but shortly after Christmas he changed his mind and decided he wanted a Super Mario Bros. party. 

So we did. 

The first hour was a pool party, then we served pizza (in honor of Mario and Luigi). Next up, games!


I made these Mario, Luigi, and a Wario hats using a pattern I found here. I made them in a 2-hour sewing frenzy  the day before and I can't believe I didn't stop to take any photos of the cutting/sewing process or close-up pics of the finished products. I only had enough yellow felt to make one Princess Peach crown, but luckily only one girl wanted it. The rest wanted to wear the stick-on mustaches! 

First, the kids played a game called "Toss the Bob-omb" where they stood around the pool and threw three small balls down the floaty thing and got points based on where it landed (a sneaky way to get them to do math). The winner got a trophy and the 2nd and 3rd place winners got medals.


I was afraid the kids would think the chintzy plastic trophies (bought at the party store) and medals (found 2 days before the party at a thrift store for $1.29) were lame, but they LOVED them and oooed and ahhed over them and carried them around proudly.

 
Next the kids played "Find Princess Peach." I hid two princess peach figurines in the yard and the kids hunted for them (sadly, no pictures of this). After lots of looking and a few hints, Sage's friend Dylan found both of them and was deemed the Peach hero. He got a trophy and a medal.

The next game was called "Pop the Bob-omb." Before the party, Sage  made all these little notes with Mario symbols on them and designated prizes to go with them.


The 1st, 2nd, and 3rd place trophies got, you guessed it, trophies. The star coins won you medals, the power-up mushrooms won chocolate coins, the stars won the star-shaped balloons we had as decorations (gold foil helium balloons with simple eyes hand-drawn on them). I can't remember what the turtle shell got but the flower got a real flower and the GAME OVER got nothing. Next, we rolled the notes up and inserted them into blown-up balloons, tied them, and put them in a safe place for later...


When later arrived, the balloons were scattered in the yard and after I replaced the ones that spontaneously popped in our too-dry grass, each kid ran to a balloon and popped it, then ran to me to redeem their prize. Sage's sweet friend Abby got the GAME OVER and I felt bad so I let her pop the extra one.

Now it's time for water balloons!


  Are you exhausted yet?  Wait! There's presents and cake!

(Bowser-shell cake instructions blogged in the previous post.)
 

I love that picture. Everyone looks happy. 


The kids ate their cake on quilts on the hill.


and Kali ate their leftovers.

Now for the final hurrah... a pinata! Sage made it in the week before the party, though we'd been brainstorming it for months. We spray painted a Costo Waffle box white (to hide the words) and then yellow, then Sage painted question marks on every side. We filled it with candy, chocolate coins, and medals and folded it closed on the bottom and taped for added security. Then the kids lined up and went at it in an orderly fashion.


One hit each for the first round,

Then two hits. Mild-mannered Simon smacked it like a pro and the candy went flying.

And the kids promptly scooped it up into their hats. 


and then the party was over. It was a success! No one got hurt or cried and everyone seemed to have a great time. It's hard to believe that this time last year we had a house full of moving boxes and today we had a yard full of friends.

Saturday, September 10, 2011

How to make a Bowser Shell Birthday Cake

For those of you who aren't familiar with Super Mario Bros., this is Bowser:


He's the bad guy. After months of deliberation, Sage decided he wanted a Bowser shell-shaped birthday cake. The night before his party I made it. Here's how:

First, I mixed 2 boxes of cake mix and poured the batter into a cake pan, a larger pie pan, and a shallow metal mixing bowl. (Note: Bowl-shaped cakes take longer to bake.) Then I let them cool separately. Here they are before the icing:


Next, I iced the bottom layer with whitie icing...


 and the other two with green...


and stacked them again,


and smoothed out the icing.


Now for the spikes. I used sugar cones that I coated with light yellow icing.


It was and experiment that kind of failed at first, but I got the hang of it. (Note: Don't just try to ram the cone in. Carve circle with a spoon first and then slowly push the cone in deep.)


Bower has 10 spikes - 4 down the middle/top and three on each side.


(Note: Have extra cones available, there may be some casualties.)

Next, I filled a freezer bag with orange icing, cut a hole in the corner of the bag,


and squeezed an orange ring around each spike at the base.

I dyed some shaved coconut green and scattered it on the tray to look like grass, and here's the end result:


I defeated Bowser!

LinkWithin

Related Posts Plugin for WordPress, Blogger...