Monday, October 31, 2011

Happy Halloween!


Love, Finn the Human, Jake the Dog, Princess Bubblegum, and the Ice King.

Sunday, October 30, 2011

How to Make a Jake from Adventure Time Costume

In my previous post, I showed you how to do a Finn costume. Today I'll show you how to make Jake.

First, measure the wearer's shoulder width plus the length from the top of their head to mid-thigh, then cut 2 pieces of yellow fleece in those dimensions, rounding at the top.

Next, cut a long strip of fleece for the outside edge of the costume and reinforce it with 2 pieces of thick fusible web in the middle. You could also use cardboard. You'll need something sturdy to shape it in a dome above the head instead of letting it drape limply.


Starting at the midpoint of the long fleece piece and the top of one of the body pieces, sew 3/8 inch along the edge.


Next, go back to the top of the head and sew along the other side.


Sew on the back body piece in the same manner.


Next, have the wearer try on the costume and carefully mark where to cut the face and armholes. Have them take it off and cut those holes. Try it back on to adjust.

Hem at the bottom and insert elastic to gather it into a bubble shape.


Now, for the face:

For the ears, cut 2 long oval yellow fleece pieces. Stitch them together and cut an opening on one side. Turn inside-out and stitch or glue it to the top of the head.


For the cheeks, cut 2 U shaped yellow fleece pieces in a size that will fit around your face hole. Stitch together and cut an opening on one side. Turn inside-out and stuff with polyfil. Stitch it around the face hole.


For the nose, cut a black 2 black ovals (I used black vinyl). Place right sides together and sew. Cut an opening in the back, turn inside-out and and stuff with a small amount of polyfil. Stitch or glue it to the cheeks above the face hole.


For the eyes, cut 2 white circles and 2 black crescents. (I used vinyl reinforced with thick fusible webbing). Glue the black crescent to the white eyeball circle. Insert them behind the cheeks and glue.


Hand-stitch black double-folded bias tape around the mouth/face hole and hand-stitch or glue 3 white teeth on top (I used vinyl).


Next, make a pair of yellow fleece pants.


You can leave the armholes open if you have a long-sleeved shirt to wear underneath, or you can sew on some yellow fleece sleeves. My daughter insisted it needed sleeves so I added them at the end. I also stitched some 3-fingered paws to each sleeve cuff.


I planned to leave the armholes open and have McKenna simply wear a yellow long-sleeved shirt,


but after she tried it on she said she thought I should sew on some real arms. Critic! But she was right.


This step would be better to do before you stitch on the face.  I also stitched some 3-fingered paws to each sleeve cuff. 


 Don't forget to add a stubby tail to the back of the body.


 And don't forget to BE AWESOME!

How to make a Finn from Adventure Time Costume


My kids love Adventure Time on Cartoon Network. Here are the main characters, Jake the Dog and Finn the Human. (If you watch the show, you're probably now singing the theme song.)


A few months ago they decided that's what they wanted to be for Halloween this year. It was a pretty big commission, but they promise to pay it off in candy. Since the cartoon is relatively new, there isn't a lot of commercial reference material (toys, costumes, etc.) so I took pictures along the way so other people could get ideas and help making their Finn and Jake costumes too. Here's Sage as Finn:.


Here's how to make it:

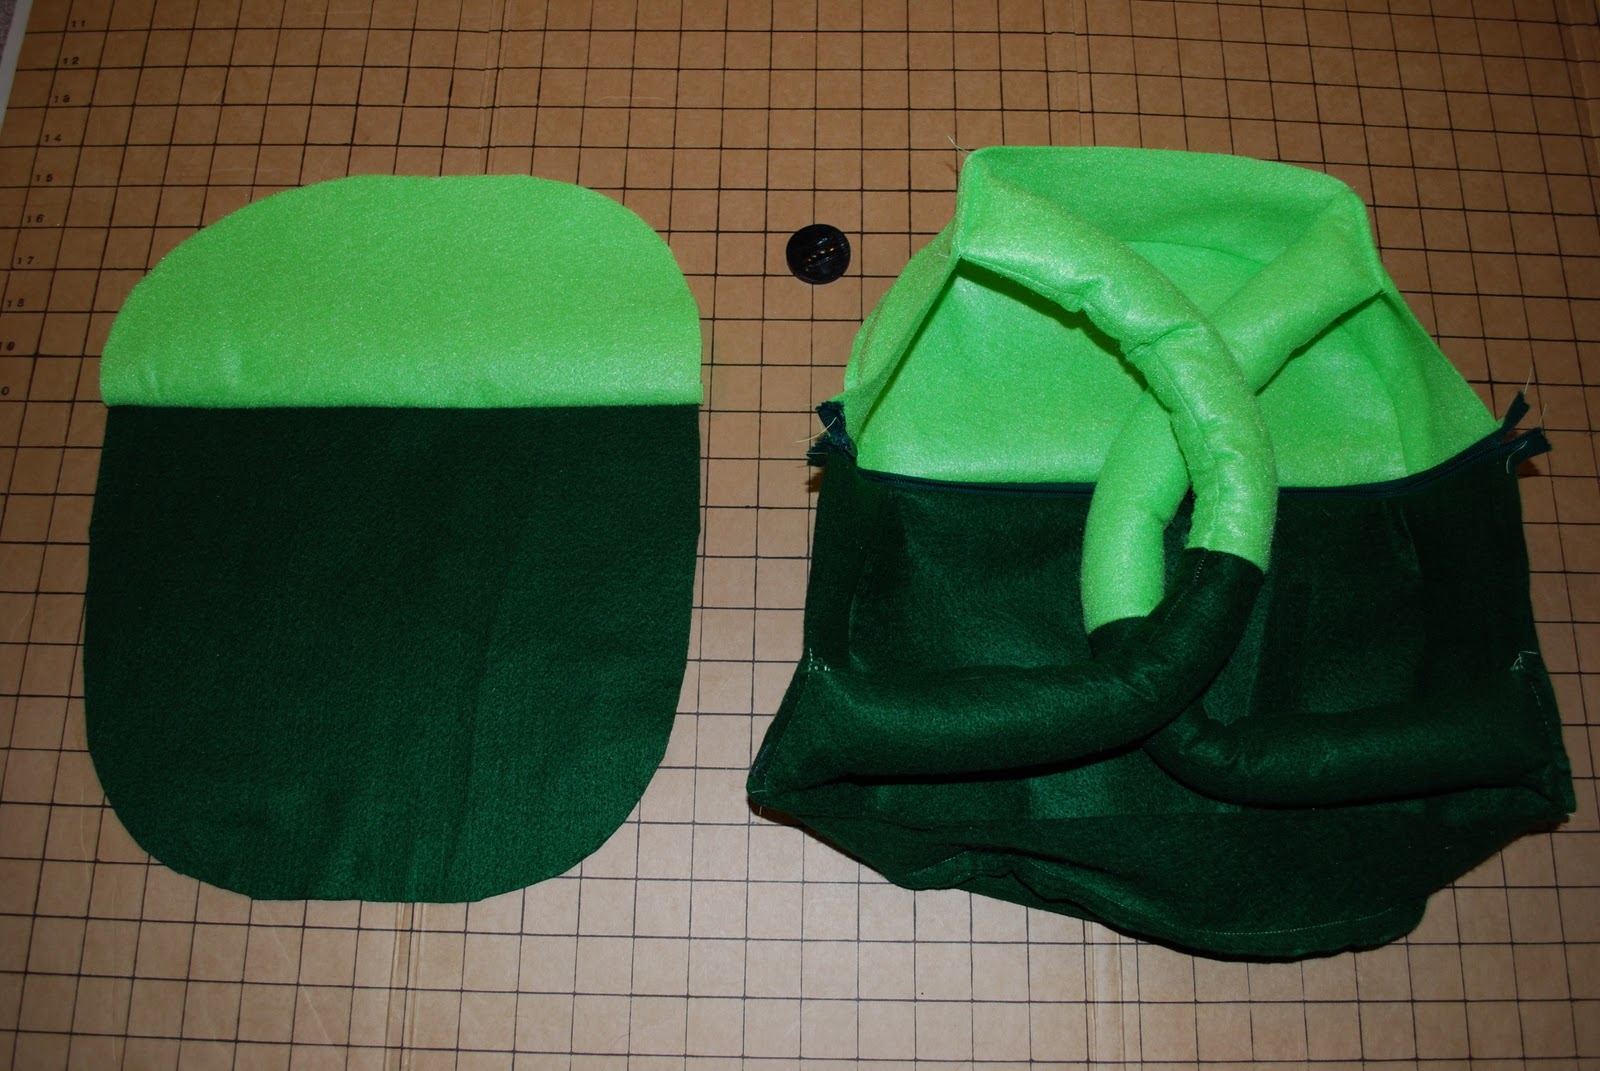
For the backpack, find some light and dark green fabric. Felt holds it's shape best. You could also use fleece or cotton.

Cut 2 light green fabric rectangles 12 inches wide by 6 inches long. Cut 2 dark green rectangles 12 inches wide by 10 inches long. Flod these pieces and round the edges.


For the edge of the backpack: Cut one dark green strip 3 inches wide by approximately 29 inches long. Cut one light green strip 3 inches wide by approximately 20 inches long.

For the straps: Cut 2 dark green strip 5 inches wide by approximately 12 inches long (10 inches long if the backpack is for a child). Cut 2 light green strip 5 inches wide by approximately 10 inches long (8 inches long if the backpack is for a child).

Other things you'll need : One 16 inch zipper and one black button and some polyfil stuffing.


Sew the dark green edge strip to one of the dark green rounded rectangles 3/8 inch from the edge. Trim any excess.


 Sew the light green edge strip to one of the light green rounded rectangles 3/8 inch from the edge. Trim any excess.

Pin and sew the dark green backpack piece to a 16 inch zipper. Next, pin and sew the light green fabric piece to the other side of the zipper.


For the straps, sew the light green fabric pieces to the dark green fabric pieces. Fold over and sew 3/8 inch from the edge.


Cut ends at an angle as shown and sew one end closed. Turn the straps inside-out and stuff with polyfil.


Pin edges to the backpack front 3.5 inches from the zipper on either side (3 inches for a child's backpack). Carefully try on and adjust as needed. Sew straps 1/8 inch from the edge.


Next pin the back panel on and sew 3/8 inch from the edge.


Unzip and turn inside-out. Sew on the button and you're done!


Now for the hat:

For an ADULT hat hat, cut a piece of white fleece 13 inches long and 28 inches wide. Fold and trim an angle one inch in from the unfolded edge. For the face hole, cut an oval 3 inches from the top and 3 inches in. For the top, cut a circle 8 inches in diameter. For the ears, cut 4 fleece pieces 3 inches wide and 4 inches tall.

For an CHILD hat, cut a piece of white fleece 12 inches long and 26 inches wide. Fold and trim an angle one inch in from the unfolded edge. For the face hole, cut an oval 2 inches from the top and 2.5 inches in. For the top, cut a circle 7.5 inches in diameter. For the ears, cut 4 fleece pieces 3 inches wide and 3.5 inches tall.

You'll need some polyfil, cotton balls,or tiny fleece bits to stuff the ears.


Sew the back edge of the hat. Next, pin the circle on top. Sew it to the hat 3/8 inch from the edge.


With the hole in front and the seam in the back, fold your circle in half to find the midline.


Mark and cut 2 slits for the ears.


Keep hat inside-out and insert ears.


Sew 1/8 inch from the edge. Repeat with the other ear.


Turn right side -out and fold bottom edge under once and stitch a straight line around the bottom.


WHAT TIME IS IT?! 


ADVENTURE TIME!


Saturday, October 15, 2011

A kokoleo kind of cupcake

 A few weeks ago my friend Stephanie mentioned that her 2-year-old daughter wanted to be a cupcake for Halloween and asked if I had any idea how to make one. Immediately my brain began swirling with ideas. They were the kind of ideas, though, that you can't explain to someone else, especially to someone who doesn't sew, so I offered to make it for her. Before I knew it I cupcake commission on my hands.

I spent a week brainstorming and gathering materials... the gorgeous tan velvet my friend Jessie gave me from her grandmother's stash (blogged here) would be perfect for the base... a big wooden embroidery hoop I've been meaning to embroider something in would be just what I need to hold it round in the middle... a toddler tanktop cut up the sides and expanded could allow it to hang perfectly from the shoulders. Luckily I already had all of these in my studio. Sometimes it pays to be an art/craft supply hoarder.


This hung on my clothing rack for a week while I brainstormed how to construct the top and gathered more supplies. Add to it a half a yard of white felt, elastic around the waist and neckline, lace around the neckline, puffballs attached with fabric glue, polyfil to stuff it, and you get this: 


Side view...


Back...

 Top...


I got the lace at a yard sale for 25 cents the week before. When I held it up and found it was the perfect length around, I had to use it.


I stitched the felt to the tank top around the armhole. It had  a wee strip of  lace around it which made for a nice fancy finish.

Since Steph's daughter is nearly McKenna's size, I had her try it out...


She didn't really understand why her mom was working on a cupcake costume that was her size but not for her, but she danced around in it anyway.


It was probably her messy hair that made me think there was one more thing it needed...


A cherry on top! (Composed of shiny red vinyl cut in a circle, gathered with elastic, and topped with  a naugahyde stem riggged with a wire - all materials I thankfully had on hand.)

* pause to pet the kitty...

 pout...


 pose...


perfect...


And now it's neatly stuffed into a box and in the hands of the USPS on it's way to the east coast and addressed to a sweet little girl named Esme.

LinkWithin

Related Posts Plugin for WordPress, Blogger...