Showing posts with label Easter. Show all posts

Tuesday, December 13, 2011

It's beginning to look a lot like Easter... wait, what?

Years ago around Easter I wrote a blog post about artist June Hoffman and the art of Eggeury. In that post I talked about the Christmas ornaments my dad's secretary made for us out of eggs. I always found those fascinating and I think of them every year when we get out our ornaments to hang on the tree. Today I searched for "Christmas Eggs" on Etsy and compiled this treasury:

 (Click on the picture to go to Etsy and see the artists' other work.) 

I love the painstaking detail in each of them and the fact that they've elevated eggs from compost fodder to fragile keepsake.  Since the ornaments my dad's secretary made are all at my parents' house, I decided to make my own for our tree. One of my favorites was an egg that contained a picture of my brother and me, decorated with ribbon and trimmed in pearls. I wanted to do that with pictures of my kids, so here's my attempt:

Here are the supplies I used: an egg, a photo, ribbon and trim, fiberfill, and a hot glue gun.


I carefully poked a hole in the center of a blown-out egg. I'm sure expert use a Dremel or some other tool, but I just used a needle and my fingers, hence the rough edges.


Then I hot glued on some trim to cover it.


 Next, I filled the egg with fiberfiill and carefully inserted the photo inside...


then squirted a dollup of hot glue into the hole at the top, inserted the knot of a string of ribbon,


 tied it in a bow, and hung it on the tree.


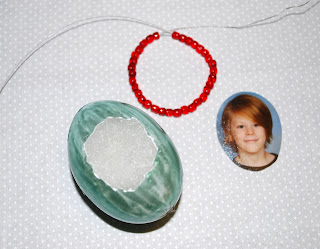
For Sage's ornament, I did it a little differently. I painted the egg with nail polish, glued the photo to the edges of the egg-hole, then glued a ring of beaded wire around the photo.


For the hanging device I squirted some hot glue in the hole on the top and inserted a looped strand of beaded wire. Here it is hanging next to his Shrinky Dink snowman:


 And here they are together, two eggs-tra special ornaments for my eggs-eptional kids.


Check back tomorrow to see the Frosty the Eggman I made! and possibly some others. We had scrambled eggs for lunch today so I have a few more empty shells begging to be transformed.

Sunday, April 24, 2011

Happy Easter!

 I just figured out how to update my blog from my phone. This changes everything!
 I hope your day is full of fresh air, flowers, and springtime sunshine.

Tuesday, April 12, 2011

Tutorial Tuesday: Embroidered Easter Eggs (the easy way)

Last week, Craft Gossip posted a link to these embroidered eggs featured on the Needle n Thread blog:


and I've been thinking about them ever since. That led me to find this project


posted along with a tutorial by CelineG on Hand Dyed Fibers.com. First you punch the holes, then you stitch the ribbon through and hope to God it doesn't crack.

I also found these on Wikipedia

made by  a Ukrainian folk artist named Forostyuk Inna. Amazing!

I just had to try this myself, so last night I whipped up these:

Except I cheated. I let someone else do the embroidery... a long time ago. I simply got out my vintage suitcase full-o-embroidered pieces that I've purchased at estate sales, flea markets, antique shops, etc. over the years and chose a few to (gasp!) cut up. Apologies to the ladies (I'm assuming) who worked so hard on these but remember, I rescued them because I recognized the time and talent that went into each piece and I held on to them for the perfect project. This was it.
Here's how you do it:

First, blow the yolk out of some eggs. If you're not sure how to do this, read this tutorial - How to Decoupage Easter Eggs - which I posted in 2009. 

Now, find an embroidered linen, the thinner and more lightweight, the better.


Next, carefully cut out the embroidered part close to, but not clipping the stitches.


Now, coat the backside with Mod Podge.


and carefully press onto an egg. For an all-over shiny look you can Mod Podge over top of the embroidered piece if you like. Let it dry overnight. To add a hanging device, squirt some hot glue into the hole and insert a wire or ribbon.


It's the perfect project for those delicate intricately embroidered hankies you never want to blow your nose into but can't bring yourself to give away. It's nice to see these pieces out of storage and on display.
 

Tuesday, March 29, 2011

Tutorial Tuesday: Plush Bunny Pattern

 A few years ago at a church bazaar in North Hollywood, I got McKenna this bunny:
 

He's a little dingy now and his hand-embroidered eyes and whiskers have snagged but he's still one of her favorite friends. I bought him for six dollars. Six dollars! Being used to indie craft markets where prices tend to reflect the amount of time and effort put into a project, I couldn't believe the price tag said $6.00. That's Made in China sweatshop prices! I've made many a stuffed monster in my day and I would be a fool to sell something that took me 2+ hours to make for only $6.00. Who works for 3 dollars an hour?  I didn't argue though, but I did ask the old lady at the checkout how she could sell her handcrafted item so cheaply. She said, "Oh honey, it just makes me happy to know you want it. I don't really care about the money." And the award for sweetest old lady in the world... goes to her.

Inspired by that bunny, I made my own version. And in honor of that generous crafty grandma I included a pattern for you to make your own too.

These are the pieces you'll need:

 
(Click on the image to enlarge and print.)


Cut 2 bodies, 4 ears, 4 arms, 4 legs, 2 tails, 2 eyeballs, and one nose. First, sew on the tail, eyeballs, nose and mouth using a zig-zag or satin stitch on your machine. Next, sew on button pupils.


Stitch together the arms and legs and (not pictured) ears.


Turn them right-side-out and stuff the extremities half-way.


Straight-stitch a line across the middle and continue stuffing, leaving a half an inch at the end. Rather than stuffing the ears, simply turn them right-side out and iron flat.


Next, stitch all extremities to the front of your bunny body.


Fold the ears and arms inward and place the back of your body on top, tail-side in. Starting at the top of the head, stitch the body parts together down the edge of one side. The other side will be a bit trickier since you have the ears and arms crammed in. Once you have the top and both side stitched, turn it right-side out through the bottom. It should look like this:


Now fold the bottom in and carefully hand-stitch closed. Ta-da!

 Finally, give it some whiskers:


Happy Spring!

(psst... next week I'll show you how to make a patchwork carrot. These bunnies get hungry!)

LinkWithin

Related Posts Plugin for WordPress, Blogger...