Showing posts with label custom. Show all posts

Friday, January 03, 2014

Another kokoleo banner/pillow update

That last post makes it seem as if kokoleo is kaput. Nope, just scaled back a little. Luckily, I have some longtime customers who keep me in business with commissions. I haven't done a personalized pillow/banner update in a while, so here's my latest batch:


The customer asked for initials so I did it monogram-style.


One week I got 2 commissions for the same name from customers on different sides of the country.


I made these pillows as a donation for an auction at my old summer camp Peterkin in West Virginia. They made $400!


 And of course, I had to make this...


to bring a little kokoleo into my new workspace.

Monday, April 22, 2013

New kokoleo personalized pieces...

I haven't done a personalized kokoleo update in a while. Here are the new names now decorating little kid rooms across the country....


Thursday, July 19, 2012

Vintage Pattern Meets African Batik Meets kokoleo

Last month I got a commission to make a sundress using authentic batik fabric that was purchased in Kenya, Africa. The customer wanted it to be a 1950s style cocktail dress based on this vintage reprint Vogue pattern:


To be honest, I'm not a fan of patterns, especially vintage ones. You'd think with all the sewing I've done that following a pattern would be no problem, but I much rather prefer devising my own way of doing things, be it custom plush monsters or a cupcake costume or any other weird one-of-a-kind. Fancy grown-up dresses with darts and gathering and interfacing and buttons and hidden side zippers still intimidate me. Which is precisely why I said, "Yes, I'll do it." To prove that I can. And I did!


 It took a few weeks of careful planning before I got up the nerve to piece it together. One wrong cut and I would have been screwed since it's not exactly the kind of fabric you can pick up at JoAnn's. Luckily, I remembered reading somewhere that vintage patterns run about 6 sizes smaller than their modern counterparts, so while the pattern I had went up to a size 14, that's really a modern size 8 and I needed to make it a 10. Argh! Math! I checked the measurements against those I took from my customer and realized that the pattern was too small so I simply trusted my seamstress instincts and cut about a 3/4 inch extra on the sides, top and bottom and followed the basic shape of the original pattern. Thankfully it fit her perfectly.

Here's the back view. The skirt is nearly 4 yards gathered at the waist.


 The only materials I purchased for this project were the shoulder buttons. I have a billion buttons in my studio stash, but not 10 identical ones.


Working with the free-form, assymetrical pattern was a bit tricky. I took extra care to line it up in a balanced, flattering manner, making sure not to let the circles be two giant bullseyes on her boobs. I thought the cummerbund needed a little something extra so I added this oversize vintage plastic button that matched the colors perfectly. I've had that button for probably 6 years now knowing it would be perfect for something some day. 


And now it's done! My confidence in my vintage pattern-following abilities has grown and my customer got a one-of-a-kind, custom-fit, African batik, vintage reproduction, kokoleo cocktail dress.

Wednesday, July 18, 2012

Summer Games and Baby Names

Oooo the summer is flying by. I haven't posted since April! Sheesh. Where does the time go? For me it's gone into entertaining the kids, organizing a neighborhood bike parade and picnic, gathering materials for a community mosaic in our park, and teaching a craft class at happy delusions every Thursday:


I've also been busy with a steady stream of personalized pillow orders lately. Here are some pics of the ones I've done in the last few months:


Such great names!

Thursday, January 27, 2011

Dear God this was difficult

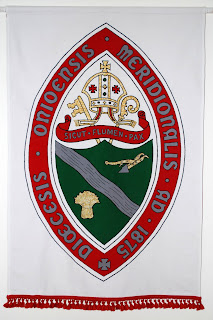
Two years ago I was contacted by a seminarian at Church Divinity School of the Pacific and asked to create a banner for the Episcopal Diocese of Southern Ohio. Having grown up in the Episcopal Church as the daughter of a priest (now bishop), I'm very familiar with the Episcopal shield so I agreed and got to work making this:


Nice, right? I was pleased with it. The problem though, is that we seemed to have some mis-communication. See, I thought I was being asked to recreate the Episcopal shield in fabric form, but instead, what she was asking for was the Diocesan Seal, which is very different. After boasting to my father that I had nearly completed the banner, he realized my mistake and sent me the image I was supposed to recreate, which was this:


At which point I felt a little sick. No offense Diocese of Southern Ohio, but that is quite a random assortment of symbols you've got there. A bale of wheat? A plow? Is that water flowing through it? And that crown! Those letters! My head was spinning thinking of all the applique and embroidery it was going to entail. So I took some time to think it over, about two years in fact. Although I always had it written on my to-do list, other projects and jobs and moving came up and the seminarian and I lost touch. But, this past November she contacted me again and said she was still interested so I promised I would have it finished by the end of January. On January 2nd I got to work. First, since there was no way I could do this freehand, I blew up the image 450% in photoshop and printed out 18 pieces of paper like a puzzle and taped them together to make this:


to use as my template. Next, I pinned the template to heat-n-bonded fabric and carefully cut out each section.


Then I cut out all the letters and nearly gave myself arthritis.


Then I forgot to take pictures, but I slowly cut out each section and ironed them down onto the banner canvas. It took about two weeks working a few hours every day.


 Next it was time to embroider. Unfortunately I don't have a fancy commercial embroidery machine, so I just shoved the whole thing into my Janome and outlined everything with black thread in a wide and close zig-zag stitch. This part took another two weeks working a few hours every night (about 45 hours total so far). Here are some close-ups:


Next, all I had left to do was turn it into a banner, the easiest part by far, though ensuring it will stay flat and hang straight was tricky. I attached the embroidered panel to a rectangle of red canvas, stitched together the edges and made a channel at the top for the rod (with a hidden buttonhole in the center for a hook to attach it to a pole, if needed), then added some decorative trim along the bottom:


And Praise the Lord, it was finished!


Hallelujah!

LinkWithin

Related Posts Plugin for WordPress, Blogger...