Friday, November 11, 2011

Custom kokoleo sensory/ fidget accessories for a girl with autism

Recently, I was asked to create a "sensory skirt" for a young girl with autism. My friend Jen is a special education coordinator for a public school in West Virginia and one of her students was having trouble sitting still on the school bus and was starting to throw things.  It was suggested that a "ribbon skirt" might help to keep her hands occupied on the ride so I was commissioned to make one. The reference photo I received was simply ribbons stitched to a ribbon waistband, but Jen and I decided that a variety of textures might be better, so I made this:


It's composed of  various ribbon, ric-rac, lace, tulle, grommets, machine-embroidered alphabet ribbon, and elastic - stitched together to make a funky kind of tutu.  It was intriguing enough to keep a fidgety child occupied for a while, I thought, but not interesting enough.

I have always been interested autism. When I was teaching I had students who were considered "on the spectrum" and I did some research on the disorder so I could find ways to reach them. One thing I remembered reading was that some people with autism are calmed by weighted clothing.  The tutu I made seemed too lightweight and too prone to become a tangled mess, so I looked around my studio for the most heavyweight  material I could find. The velvet I got from my friend Jessie's grandmother was perfect. Next, I found a pair of cut-up jeans I'd been using for various projects and I cut out the pockets. Then I needed items of fidgety interest - zippers, ric rac, shiny brass buttons and some super-soft fringe.  I assembled all the pieces on the velvet and double-stitched them down securely.


In each pocket, I hid a plaything - a fuzzy pink heart in one and a smooth embroidered vinyl smiley face in the other. Each were attached securely to the inside of the pocket with some ric-rac. Since this girl's problem was throwing things, I figured I'd give her toys that would come back to her when she tossed them.


The waistband is a thick elastic that wraps around like an adjustable belt and secures with a metal double-ring  buckle at the hip. The thick fringe trim plus another velvet piece on the back make it substantially weighted, yet soft, like a thick lap quilt.
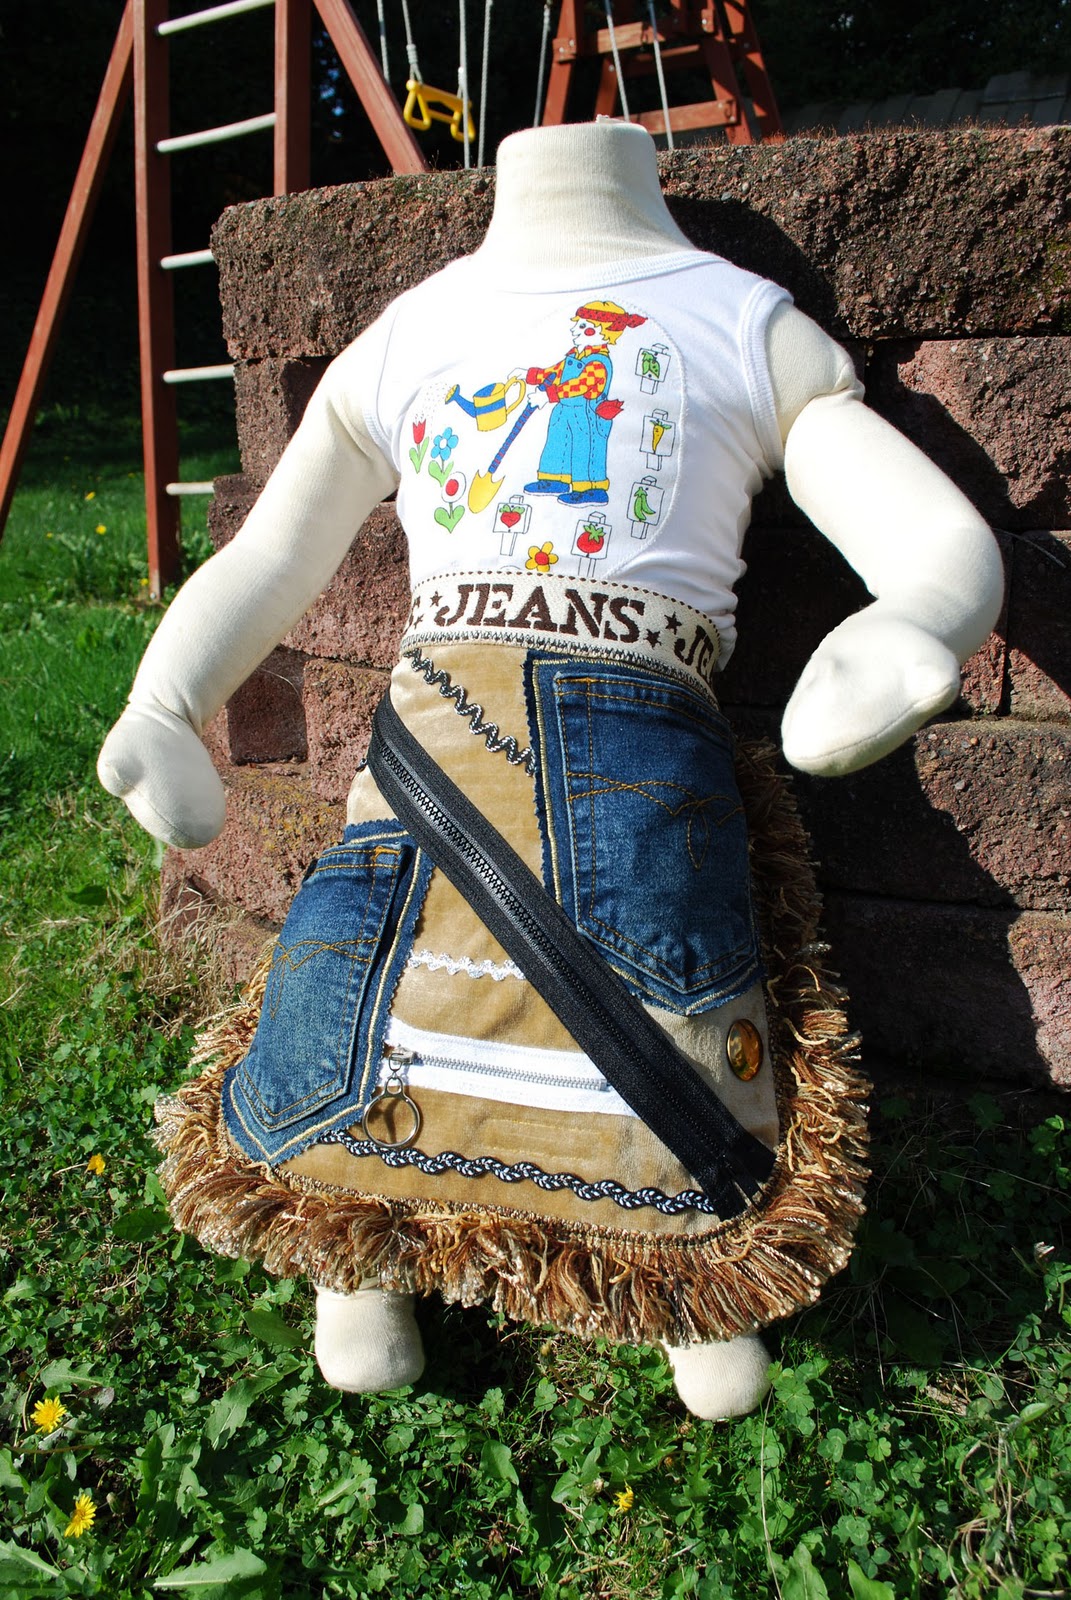

I envisioned the girl's mother wrapping this apron around her daughter's waist before her bus ride and then the young girl sitting in her seat, comforted by the weight of fabric on her lap, moving the zippers back and forth, up and down, tracing the zig-zag pattern of the ric-rac, seeing her reflection in the shiny brass buttons, running her fingers through the super-soft fringe, and pulling out the fluffy heart and smooth smiley face to play with on the ride to school. That's my hope at least.


I got an email from Jen today. She said the girl like the tutu, but REALLY liked the apron. That makes me happy. I hope it helps.

Are you interested in a custom fidget apron for someone with sensory issues or autism? Send me an email and I'd be happy to discuss a design to fit your needs.

Thursday, November 10, 2011

Thrift Thursday... For the Family

Wait, it's Thursday already? The week went by fast. I had plans of photographing some of my collections of thrifty treasures (vintage mugs, stationary, wrapping paper, fabric)  but never got around to it. I've been pretty busy with commissions, which I haven't blogged about either. That's next on the agenda. But this afternoon, instead of doing any of that, I went shopping. It's was half-price day at Value Village and I found some awesome deals. Armed with $58 I made off a recent pillow commission, I got all this:


A Kenneth Cole faux leather jacket in shiny new condition for Sage. 5 bucks (originally $9.99). Even he admitted it was pretty cool, and he's pretty picky when it comes to his clothes. He also got a Shawn White flannel and Mossimo cords for $5. Pants, a shirt and a jacket for $10 - not bad considering they would have gone for about $100 retail.

McKenna got this shirt and embroidered jeans:


for $2.50, and a striped shirt, black velvet Levi's, and these rain boots, which I wish could fit me:


The kids also got to pick out one toy each, the getting of which was dependent upon their behavior in the store (yes, I bribe them). Sage got a Nerf Super Soaker ($4) and McKenna got a Playdough tiki pirate ship playset ($3). Toys weren't on sale but it was a small price to pay for being allowed to shop in relative peace.

McKenna also got these CDs:


because she listens to music every night and I was getting tired of the same old songs. We listened to most of them when we got home and they're great. ($2 each, not on sale) She also asked for this book:


Which freaked me out a bit because I had this book as a kid and loved it. It's a scratch-and-sniffer and though it's lost all it's sniff-ness, for 69 cents I had to get it.

It was slim pickins for kokoleo finds, but I did get this Shakespeare linen:


for 99 cents. I'm envisioning a pillow or tote in the near future, the perfect gift for some Shakespeare nerd. (As a former English major, I know they're out there.) 

I also got Erik a pair of Steve Madden shoes for $2.50 but he told me if I post a pic of them on my blog he won't wear them because he doesn't want people commenting on his blogged-about thrift store shoes. But he liked them.

Finally for myself, I found some new-with-tags running pants for $5 and this frilly top and flower pin:


 for $5 total. And I, unlike Erik, don't mind if you comment on my thrift store finds.

Thursday, November 03, 2011

Thrift Thursday Returns!

I haven't done a "Thrift Thursday" in a while and I think it's time to revive the tradition. Here's my latest acquisition:


A tiny painting (5" x 7") of the massive Mt. Rainier. At least, I think it's Mt. Rainier. (It looks similar to the pics we took on our visit to Mt. Rainier Park). Purchased at the Goodwill in Kent where, when you stand in the parking lot on a clear day you can see Mt. Rainier in the distance.

It cost me 99¢. The frame is a little worse for wear and I may revamp it, but I'm loving the little window to the outside world it gives to my windowless bathroom.

Tuesday, November 01, 2011

How to Make an Ice King Mask (and Princess Bubble Gum too)

Last one and then I'm done. These have all been published on Instructables (and featured on their home page - whoo!) but I thought for posterity's sake I'd publish them on my blog too.


I used this pic for all the characters I made:


and came up with this for the Ice King:


White Fleece works well for the beard and eyebrows, but you'll need some sturdy material for the other face pieces. I used vinyl, but you could also use posterboard.

Cut out the face piece as shown.


Before you cut the eye holes, hold it up to the wearer's face and mark where to cut.

Lay the face piece on top of your fleece and cut out the beard. Cut out some eyebrows from the scraps.


Cut out a frowny mouth and pointy teeth.


Cut a crown and 3 red gemstones.


 Cut out a space in the beard for the eye holes.

Apply a generous amount of fabric or tacky glue to the back of the mouth and face pieces and attach them to the beard. Do the face first, then lift the nose and insert the mouth underneath.


Glue on the eyebrows and teeth.


Glue the gems on your crown. On the back of the crown, I glued on a thick fusible stabilizer to reinforce the points and make them stand up. You could also use cardboard.


Attach the crown to the face with glue or a sewing machine straight stitch. Measure around the head and secure with a straight stitch or heavy duty glue.

With a sharpie, draw lines on the gemstones and under the eyes.

For the robe, I got a blue graduation gown at the thrift store. To keep the beard in place, I used glue dots on the shoulders.

My husband found it difficult to see while trick-or-treating in the dark, so he simply turned the crown around and wore it backwards. (Also a good tip if you want to drink at a party.)


For Princess Bubblegum, I made a crown out of the same vinyl I used for the Ice King's crown and added a green "gemstone" (cut from an old shower curtain). I reinforced it on the back so it would stand up.


For the outfit, I bought a pink shirt and skirt at the thrift store and made a purple sash to go around the waist. For the hair, I bought a Rapunzel wig and sprayed it hot pink with temporary hair color (which rubs off on anything that touches it).


Whew! That was quite a labor of Halloween costume family love.


Monday, October 31, 2011

Happy Halloween!


Love, Finn the Human, Jake the Dog, Princess Bubblegum, and the Ice King.

Sunday, October 30, 2011

How to Make a Jake from Adventure Time Costume

In my previous post, I showed you how to do a Finn costume. Today I'll show you how to make Jake.

First, measure the wearer's shoulder width plus the length from the top of their head to mid-thigh, then cut 2 pieces of yellow fleece in those dimensions, rounding at the top.

Next, cut a long strip of fleece for the outside edge of the costume and reinforce it with 2 pieces of thick fusible web in the middle. You could also use cardboard. You'll need something sturdy to shape it in a dome above the head instead of letting it drape limply.


Starting at the midpoint of the long fleece piece and the top of one of the body pieces, sew 3/8 inch along the edge.


Next, go back to the top of the head and sew along the other side.


Sew on the back body piece in the same manner.


Next, have the wearer try on the costume and carefully mark where to cut the face and armholes. Have them take it off and cut those holes. Try it back on to adjust.

Hem at the bottom and insert elastic to gather it into a bubble shape.


Now, for the face:

For the ears, cut 2 long oval yellow fleece pieces. Stitch them together and cut an opening on one side. Turn inside-out and stitch or glue it to the top of the head.


For the cheeks, cut 2 U shaped yellow fleece pieces in a size that will fit around your face hole. Stitch together and cut an opening on one side. Turn inside-out and stuff with polyfil. Stitch it around the face hole.


For the nose, cut a black 2 black ovals (I used black vinyl). Place right sides together and sew. Cut an opening in the back, turn inside-out and and stuff with a small amount of polyfil. Stitch or glue it to the cheeks above the face hole.


For the eyes, cut 2 white circles and 2 black crescents. (I used vinyl reinforced with thick fusible webbing). Glue the black crescent to the white eyeball circle. Insert them behind the cheeks and glue.


Hand-stitch black double-folded bias tape around the mouth/face hole and hand-stitch or glue 3 white teeth on top (I used vinyl).


Next, make a pair of yellow fleece pants.


You can leave the armholes open if you have a long-sleeved shirt to wear underneath, or you can sew on some yellow fleece sleeves. My daughter insisted it needed sleeves so I added them at the end. I also stitched some 3-fingered paws to each sleeve cuff.


I planned to leave the armholes open and have McKenna simply wear a yellow long-sleeved shirt,


but after she tried it on she said she thought I should sew on some real arms. Critic! But she was right.


This step would be better to do before you stitch on the face.  I also stitched some 3-fingered paws to each sleeve cuff. 


 Don't forget to add a stubby tail to the back of the body.


 And don't forget to BE AWESOME!

How to make a Finn from Adventure Time Costume


My kids love Adventure Time on Cartoon Network. Here are the main characters, Jake the Dog and Finn the Human. (If you watch the show, you're probably now singing the theme song.)


A few months ago they decided that's what they wanted to be for Halloween this year. It was a pretty big commission, but they promise to pay it off in candy. Since the cartoon is relatively new, there isn't a lot of commercial reference material (toys, costumes, etc.) so I took pictures along the way so other people could get ideas and help making their Finn and Jake costumes too. Here's Sage as Finn:.


Here's how to make it:

For the backpack, find some light and dark green fabric. Felt holds it's shape best. You could also use fleece or cotton.

Cut 2 light green fabric rectangles 12 inches wide by 6 inches long. Cut 2 dark green rectangles 12 inches wide by 10 inches long. Flod these pieces and round the edges.


For the edge of the backpack: Cut one dark green strip 3 inches wide by approximately 29 inches long. Cut one light green strip 3 inches wide by approximately 20 inches long.

For the straps: Cut 2 dark green strip 5 inches wide by approximately 12 inches long (10 inches long if the backpack is for a child). Cut 2 light green strip 5 inches wide by approximately 10 inches long (8 inches long if the backpack is for a child).

Other things you'll need : One 16 inch zipper and one black button and some polyfil stuffing.


Sew the dark green edge strip to one of the dark green rounded rectangles 3/8 inch from the edge. Trim any excess.


 Sew the light green edge strip to one of the light green rounded rectangles 3/8 inch from the edge. Trim any excess.

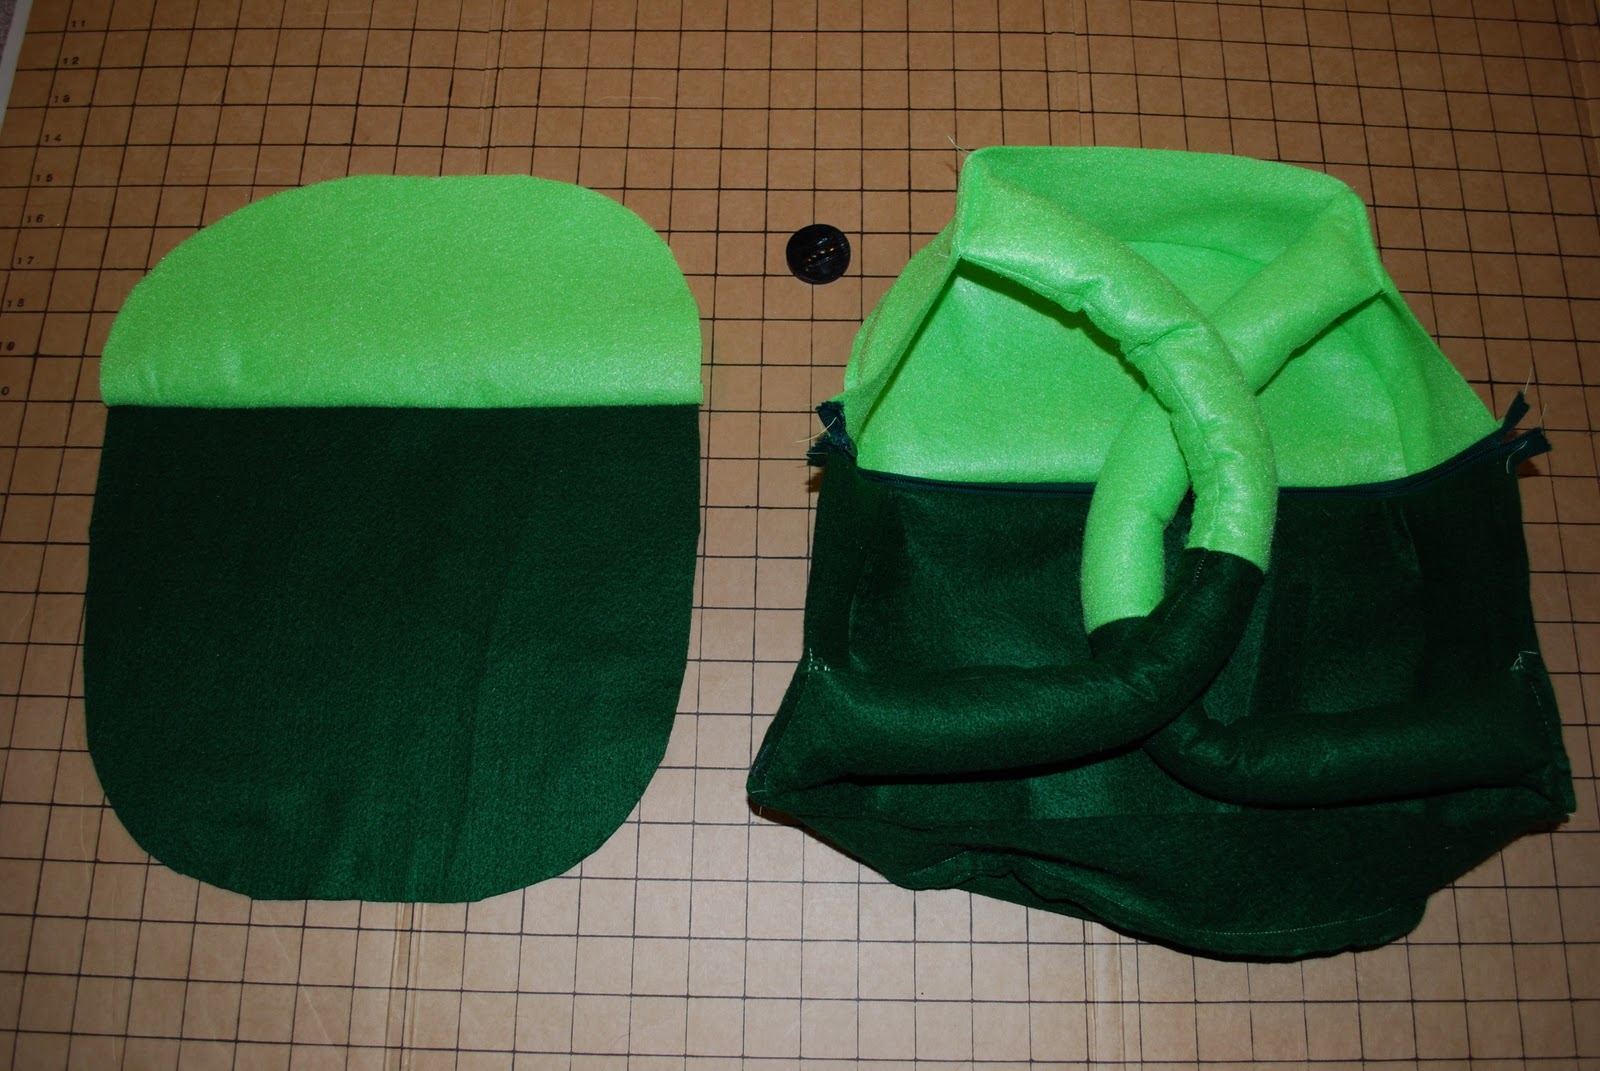
Pin and sew the dark green backpack piece to a 16 inch zipper. Next, pin and sew the light green fabric piece to the other side of the zipper.


For the straps, sew the light green fabric pieces to the dark green fabric pieces. Fold over and sew 3/8 inch from the edge.


Cut ends at an angle as shown and sew one end closed. Turn the straps inside-out and stuff with polyfil.


Pin edges to the backpack front 3.5 inches from the zipper on either side (3 inches for a child's backpack). Carefully try on and adjust as needed. Sew straps 1/8 inch from the edge.


Next pin the back panel on and sew 3/8 inch from the edge.


Unzip and turn inside-out. Sew on the button and you're done!


Now for the hat:

For an ADULT hat hat, cut a piece of white fleece 13 inches long and 28 inches wide. Fold and trim an angle one inch in from the unfolded edge. For the face hole, cut an oval 3 inches from the top and 3 inches in. For the top, cut a circle 8 inches in diameter. For the ears, cut 4 fleece pieces 3 inches wide and 4 inches tall.

For an CHILD hat, cut a piece of white fleece 12 inches long and 26 inches wide. Fold and trim an angle one inch in from the unfolded edge. For the face hole, cut an oval 2 inches from the top and 2.5 inches in. For the top, cut a circle 7.5 inches in diameter. For the ears, cut 4 fleece pieces 3 inches wide and 3.5 inches tall.

You'll need some polyfil, cotton balls,or tiny fleece bits to stuff the ears.


Sew the back edge of the hat. Next, pin the circle on top. Sew it to the hat 3/8 inch from the edge.


With the hole in front and the seam in the back, fold your circle in half to find the midline.


Mark and cut 2 slits for the ears.


Keep hat inside-out and insert ears.


Sew 1/8 inch from the edge. Repeat with the other ear.


Turn right side -out and fold bottom edge under once and stitch a straight line around the bottom.


WHAT TIME IS IT?! 


ADVENTURE TIME!


LinkWithin

Related Posts Plugin for WordPress, Blogger...